Dockerfile inventory
Changed on 2024-03-04: Added section
Containers are used in multiple ways by bioconda-utils. Broadly, we can divide them into containers used for building packages, containers for running packages, and containers used for the bot.
Containers vs images
Containers vs images
An image is like a static snapshot, while a container is a running instance of an image. A single image can be used to start multiple containers. Changes made to a container are not saved back to the original image used to start the container, but it is possible to make a new image from the latest state of a container … which can later be used image to start yet more containers that start from that latest state.
Docker, podman, buildah, OCI
Docker, podman, buildah, OCI
Open Container Initiative (OCI) specification defines the format of images. Buildah is a tool for creating OCI images, and podman is a tool for running them. Docker is a tool for both creating OCI images and running containers made from them.
Overview of containers used in building
For every recipe, Bioconda builds not only conda packages for mulitple architectures like osx, linux/amd64, linux/arm64, but also OCI images (linux/amd64, linux/arm64) with the package installed. Here’s how it works.
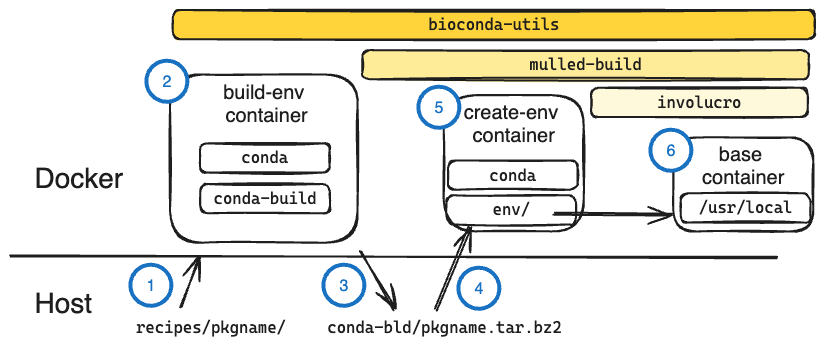
Description of steps:
These steps are all coordinated with running bioconda-utils build pkgname in the bioconda-recipes repo.
Recipe on the host is mounted as a volume in the build container. The host’s conda-bld directory is also mounted in the container. We call this the build-env container.
The build-env container uses conda-build to build a conda package from the mounted recipe.
The newly-built conda package is saved in the conda-bld directory mounted from the host. The build-env container exits.
The new conda package is mounted into a minimal container that has conda installed (but not conda-build or bioconda-utils or any other dependencies). This is the create-env container.
The package is installed (with conda install) into create-env’s conda environment. This of course includes all dependencies specified in the recipe. The recipe’s test commands are also extracted.
Only the contents of the
env/directory in the create-env container are copied over into the/usr/localdir of a minimal base container (which does not even include conda). The extracted tests are run in the container as a final check (see notes below on --mulled-build-and-test), and then the container is ready to upload to a container registry.
Why do we do it this way? The short answer is to ensure that all dependencies are accurately captured in the recipe.
More details on this rationale:
We build on multiple CI providers (CircleCI, GitHub Actions, Azure DevOps). Any one of these providers may install or update libraries on their hosts at any time. If we didn’t use containers for isolation when building packages, a package could silently depend on those system libraries when building. While the build might work on CI that already has those libraries, it will be broken on ar machine without those libraries.
So bioconda-utils build --docker runs conda-build inside a Docker
container, isolating it from the host and preventing any host libraries from
being used. As with a normal conda build command, the resulting
package is found in the host’s conda-bld directory. This is illustrated
in steps 1-3 above.
When we additionally use the --mulled-build-and-test argument, bioconda-utils will run mulled-build from the galaxy-lib package. mulled-build is a tool to convert conda packages into Docker images. It uses involucro to make a final, minimal image with a dramatically reduced file size. This is illustrated in steps 4-6 above.
The base image has very few packages or libraries installed – not even conda. So the end result is a fully-isolated, minimal Docker image with nothing but the installed package and its dependencies (and therefore a small size), ready to be uploaded to a repository.
Note that --mulled-build-and-test runs the tests extracted from the recipe in the minimal container. Since the container only contains the package and its dependencies, any tests must use only these. Even if the recipe specifies additional test dependencies or additional test data (which is supported by standard conda-build), these are not copied over to the final image and tests with additional dependencies will therefore fail.
Details of containers using in building
The build-env image is used for building a package in a manner that is isolated from the host. The built package appears back on the host’s local channel.
The create-env image is used by mulled-build for creating a conda environment with the package and dependencies installed in such a way that the resulting conda env can be easily copied out by involucro.
The base image is used by involucro as a starting image into which it will copy the conda env created by mulled-build in the conda image
The extended base image is used in rare cases where very minimal base image
is too minimal. In this case, recipe authors can specify
container:extended-base:true in the meta.yaml file, and the extended image
will be used as the base instead.
Here are the images, their respective Dockerfiles, and their quay.io repository names. All images are built in the bioconda-utils build-images GitHub Action workflow.
The base image and extended base image have major.minor.patch versions (e.g.,
1.2.3) as their tags. The build-env image and the create-env image have
both the bioconda-utils version as well as the base image version (e.g.,
2.11.1-base1.2.3). This is because the images loosely depend on each other
for things like locale, and exact version of conda/mamba.
description |
image |
maintained in |
dockerfile |
built by |
|---|---|---|---|---|
build image |
|
bioconda-utils |
||
conda image |
|
bioconda-containers |
||
base image |
|
bioconda-containers |
||
extended base image |
|
bioconda-containers |
As of Nov 2023, each of these is configured to be built on both amd64 and arm64 (a.k.a x86_64 and aarch64) architectures.
In the actual bioconda-utils code, the containers are specified in several ways. Note that the links to code below point to specific commits in order to highlight a line, so these may not be the most up-to-date code. But it can give you a starting point for where to look.
The build image is configured in bioconda_utils/cli.
mulled-build pays attention to env vars that define what images to use.
bioconda_utils.pkg_test.test_package() sets DEST_BASE_IMAGE to the
base_imagearg, which in turn is set in bioconda_utils.build.build(). This can take one of two hard-coded values, depending on if the recipe needed an extended image or not.mulled-build also needs a conda image to use. This is set by bioconda-utils in pkg_test.py
- which is then passed to `build.build
Container registry credentials for uploading images to quay.io are configured via environment variables (see credentials for details).
The bot
The BiocondaBot responds to comments on PRs an interacts with some artifacts created by package builds. In order to have rapid response times, the bot is implemented as a set of tagged Docker containers.
The bot actions largely consist of relatively simple HTTP requests. The code
for these actions is maintained in the src/bioconda_bot
Python package, within the bioconda-containers repo. There are different tagged
images for the different behaviors of the bot, which are built and pushed in
the bot.yaml
GitHub Action workflow in the bioconda-containers repo. For example, the
comment behavior on bioconda-recipes is defined here,
which uses the quay.io/bioconda/bot:comment container, sets some env
variables that GitHub Actions has access to, and runs bioconda-bot
comment in the container. This container was created here,
when the matrix.tag was set to “comment”.
